Tag: Bulgarian Cuisine

  • Bulgarian Burek

    Bulgarian Burek

    The famous Lebanese author Gibran Khalil Gibran used to say that the orient begins where people drink boza. Now hundred years later, we are no longer talking of the orient as such little more does any one mention this wonderous drink that could be sampled only in Bulgaria and Turkey called boza. For me however, boza goes well together only with one thing – Bulgarian banitza or burek. This lovely multi-layered pastry affair has so many flavour variations and could be enjoyed warm or cold anytime of the day. Only the west Balkan countries and Turkey really know how to roll their sleeves and make this wonderous delight that taste nowhere better than home. And home is where I grew up watching how my mother wowed every special guest by throwing this thin dough pastry to stretch over her head over and over again until see-through thin sheets were ready to fold into a delicious burek.
    I have learned a lot ever since. I have tried tested French culinary techniques shaping marvelous creations with ease, yet still throwing the thin burek sheets to stretch over my head remains an unachievable mystery. Luckily there are other means to achieving the same goal and my carefully described simple steps below may guide you in preparing your own home made burek with ease.
    Biting into a layer of crispy top sheets sinking into a more mellow dough rich with butter and feta cheese will make you wish to savour every crumble, reaching out for more. Dreaming about the orient into your own kitchen does not get (taste) any better then that.

    Ingredients

    • 300ml lukewarm water
    • 1tbsp oil
    • 1tsp vinegar
    • 1tbsp salt
    • 500g flour (sifted)
    • 100g butter (or margarine)
    • 100g feta cheese
    • 1-2 cups of virgin olive oil


    Method

    1. In a large bowl or jar mix together the lukewarm water, the table spoon of oil and the tea spoon of vinegar.
    2. Sift the flour in a very large bowl and add one table spoon of salt. Make a well in the center and gradually start pouring inside the water, oil and vinegar liquid with one hand, while mixing the flour and the liquid with the other. Once all the liquid has been poured over the flour, mix together until the softened mixture starts to stick together. Continue mixing trying to absorb as much as possible from the flour. When you notice that the flour is not getting absorbed anymore flip the dough mixture and the remaining flour on to a clean surface (kitchen top or table). Use the remaining flour to slightly cover the surface and start kneading the dough for approximately 15 to 20 minutes until the it becomes not sticky any more, firm and smooth. Cut the dough in 5 pieces and round each one into a small ball. Lightly grease the surface of a kitchen table with oil and put on top of it one of the balls. With your hand flatten the ball into a disk and pour more oil on top of it so it doesn’t dry out. Repeat the same with the remaining balls placing them as disks slightly overlapping one another generously greased with oil in-between. Let them rest for 30 minutes.
    3. Pour oil on the top of a kitchen table and smear it together covering the entire surface. Grease the base of an oven baking tray and place it (on a chair) close by the oiled table top. Soften the butter and mix together with a crumbled feta cheese placing them in a bowl ready to be used in a moment. Take one of the disks, place it in the center of the table and pour more oil on top of it. Oil a wooden rolling pin and carefully try to roll the disk out stretching as thinly as possible. Once you notice that with the rolling pin the dough could not be stretched any more, place the wooden rolling pin aside and starting from one side of the disk start to lift the dough allowing air to go underneath and stretch further as much as possible. Repeat several times from all sides of the disk until the dough becomes see-through thin. Sprinkle small bits of mixed butter and feta in the central part of the stretched dough disk. Fold the four sides into an envelop wrapping the feta and butter pieces inside. Place the dough envelop on the pre-oiled baking tray.
    4. Oil the table top once more and place the second dough disk in the center. Repeat the same process up to the moment the dough has become fully stretched then take the envelop dough from the tray and place it in the center of the stretched disk. Sprinkle feta and butter mixture over the disk and wrap the second stretched disk in an envelop shape again with the first envelop inside. Repeat this process until all disks have been stretched and wrapped into one large multi-layer envelop. With the smooth side up (envelop shape down) place the ready burek on the baking tray.
    5. Pre-heat the oven to 200C. Place the burek inside and let it bake for approximately one hour until golden brown. Take out of the oven and let it rest for 10 min until slightly cool. Cut into squares and serve cold or warm. Delicious for breakfast served with natural yogurt mixed with a spoon of honey.

  • Garash Cake

    Garash Cake

    The Christmas holiday season is behind us. It always feels a bit like climbing a mountain heel. I am enjoying the journey, the beauty of discovering little things at every stop on the way and the thrill and anticipation of seeing the view from the top of the  mountain. We have reached the peak at New Year with a spectacular display of fireworks and cascading emotions full of hope for all that is to come and now that the holidays are over, I am still cherishing the sparkling images of the memorable experiences of all that has been left behind.

    This image of a traditional Bulgarian Garash Cake is one of them. Gracing our Christmas eve dining table, it was a stunning centrepiece at the end of festive meal. Rich and decadent, beautifully balancing the flavours of a crunchy walnut meringue and the softness of a cacao butter cream, contrasted by the delicate zest of fresh berry fruits. We have savoured every bite… A perfect celebration cake just to enjoy indulging oneself or to be generous and share with others. I for myself, know exactly what to choose.

    Ingredients

    For the cake
    • 8 egg whites
    • 1/2 cup of sugar
    • 3 cups of walnut meal
    • Vanilla essence (8g Vanilla sugar Dr. Oetker)
    • pinch of salt
    • 1tsp cornflour
    • Raspberries
    • Redcurrant
    • Blueberries
    • Powder sugar
    For the cream
    • 1 cup of sugar
    • 1 cup of water
    • 5 tbsp cacao powder
    • 125g butter
    • 8 egg yolks


    Method

    1. For the cake. Break the eggs, splitting the whites and the yolks in two separate bowls. Put the yolks aside as they will be needed for the cream. Start preparing the cake layers by whisking the egg whites with a pinch of salt. Ones the soft peaks start to form add the vanilla essence and gradually spoon per spoon in regular intervals of whisking add the sugar. Ones the meringue start to form stiff peaks add one tea spoon of corn flour. Add the walnut meal to the meringue and gently fold it together with a spatular.

    2. Layer a baking tray with a baking paper. Using a pen and a round baking form, circle on the baking paper the round size of the cake layers you would like to have. Set a plain round nozzle in a piping bag (the same size you would normally use for making macarons – 12) and fill the bag with the walnut meringue mixture. Starting from the centre of the circle on the baking paper, squeeze the cake mixture making round circles until you reach the end of the rim of the shape you would like to create.

    3. Pre-heat the oven to 175C. Set the tray in the oven and bake for 30 minutes. The cake layer is ready when you touch it and it does not stick to your hand. Take it out of the oven and let it cool completely. In the mean time pipe the second layer of the cake and bake. Depending on the size of the circle you should be able to make between 4 and 6 layers of the cake. Try to make them as thin as possible. Once cooled peel off the baking paper from the baked meringue layers.

    4. For the cream: In a small pan over a medium heat mix together the water and the sugar until the sugar has dissolved. Add the cacao powder and mix the sirup until all is well combined. Take it out of the heat and let it cool completely.

    5. In a separate bowl whisk together the slightly soft butter and start adding the egg yolks one by one. Once all the eggs have been combined add the slightly cooled cacao sirup and whisk together until well combined. Set to cool in the fridge for at least one hour.

    6. To assemble the cake: Lay the first meringue layer in the centre of a serving dish. Set a start shaped nozzle in a piping bag and fill it in with the cacao cream. Starting from the centre of the cake pipe in a rozzet shape form the cream util it reaches the rim of the cake. Set the second meringue layer on top and pipe the cream on top. Repeat until you set the final top layer and decorate it on top with the cream. Put the cake in the fridge and let it rest overnight.

    7. Before serving decorate the top of the cake withe fresh fruits like raspberries, blueberries and redcurrant and dust with powder sugar.

  • Meat Roll “Stephanie”

    Meat Roll “Stephanie”

    What a delightful perfection. It is indeed, not very humble of me, but I am really glad how easy and perfect this Meat Roll “Stephanie” has turned out to be. My mother used to make it for us at home when we were kids, and I must admit I have not tasted it ever since. Now, in a moment of inspiration, I have decided to prepare it as our lunch meal served with lettuce salad and what a delicious joy it has been.

    My husband has enjoyed it even more. As a passionate cook himself, there are these moments in our family when he will recognize some of my culinary performances and will take my hand in his, kiss it gently saying “thank you for everything” and then he will shake it by saying “this meal has been a real triumph”. Beautiful moments, intensely homey and intimate. A celebration of every day life and something delicious. Who says that the love of the man does not go through the stomach?


    Ingredients

    • 1 kg minced meat
    • onion, thinly sliced
    • 5 eggs, 1 egg white and 1 egg yolk
    • 2 carrots, peeled
    • 2 slices of bread
    • 250ml milk
    • 4-6 small pickled cucumbers
    • 4 tbsp freshly chopped parsley
    • 4 tbsp freshly chopped chives
    • Salt
    • Black Pepper


    Method

    1. Pour the milk in a bowl and dip inside one by one the bread slices soaking them well. Squeeze all liquid from the bread and tear them into small pieces.

    2. In a large bowl, mix together the bread crumbs, the minced meat, the chopped onion, the chopped parsley and chives one egg and one egg yoke, seasoning with salt and black pepper. Mix well until all is combined.

    3. Cut the carrots on sticks and boil them until softened.

    4. Boil 4 eggs for 10 minuten making sure they are heard inside. Peel the shells. Cut the pickled cucumbers into sticks.

    4. Spread a square size baking paper on a flat surface and dust on top of it some flour. Place the already made minced meat mixture on top of the floured surface and flatten it down to resemble a rectangle. Place the four boiled and peeled eggs in the middle forming a line. Surround them from both sides lining the carrot and pickled cucumber sticks forming two lines from each side of the eggs.

    5. Lifting the baking paper from one side fold the minced meat together into a roll with the eggs remaining in the centre.

    6. Lift and place in a lined with baking sheet cooking form. Brush the surface of the roll with the egg white.

    7. Pre-heat the oven to 200C. Bake for one hour until the meat is nicely brown.

    8. Serve while still warm, sliced into pieces.

  • Bulgarian Gjuvetche

    Bulgarian Gjuvetche

    My mother and me are swapping recepies today. She is cooking my Oatmeal cookies and I am making her traditional Bulgarian gjuvetche. Often people ask me what is the most typical Bulgarian dish and I am usually struggling to give an undivided answer. If I say Moussaka, I inevitably get the answer that this is a Greek dish. If I say Shopska Salad, all the neighbouring countries like Greece, Serbia, Macedonia… have a similar version of this famous salad, that claiming the unique origin of the recipe by the Bulgarians sounds somewhat suspicious. However, there is one dish that stands out as typical Bulgarian, unclaimed by any other nation and this is the simple, humble gjuvetche. The gjuvetche, is hotpot consisting traditionally of meat, vegetables and feta cheese, all layered one on top of another cooked in tomato sauce. The pièce de résistance is an egg, soft and gooey, completely smoothing the depths and richness of the remaining ingredients. There are as many variations of the gjuvetche in Bulgaria as there are households. Based on necessity, people throughout the centuries where always adapting the recipe cooking from what was available at home at the moment, enriching this dish to an upmost perfection. No wonder it is so much loved by so many people. My mother’s recipe follows tradition, yet I am the one adding a new dimension by incorporating Spanish chorizo within the base ingredients. The result is heaven – deep and spicy bakes sausages, simmered in red chilly tomato sauce, enhanced by the bakes chorizo, soft potatoes, paprika and feta cheese, and topped with a soft egg.


    Ingredients

    (Serves 3 people)
    • 3 sausages
    • 1 Chorizo sausage, cut in pieces
    • 1 onion, cut in rings
    • 3 potatoes, cut on thin disks
    • 1 red paprika, cut in rings
    • 100ml water
    • 500g red chilly tomato paste
    • 250g Feta cheese
    • 1 egg
    • fresh parsley and fresh chives to garnish
    • 2 tbsp of olive oil
    • pepper
    • salt


    Method

    1. Bake the three sausages until they are almost done. Cut them in small pieces.

    2. Pour two spoons of olive oil in a deep cooking clay pot. Arrange the base with the pre-cooked sausages and the chorizo. Lay on top the onion rings, the potato rings and season with salt and pepper, than cover with the tomato paste and water. Top the dish with the red paprika and sprinkle feta cheese crumbs. Cover the clay pot with a lid.

    3. Pre-heat the oven to 225C. Set the clay pot inside and bake for one hour until the potatoes have softened. Crack an egg in the middle of the dish and return it to bake in the oven for 10 more minutes.

    4. Serve by garnishing with fresh herbs.

  • Red Beans

    Red Beans

    My grandmother was sitting in the kitchen almost the whole morning. On the wooden fire stove slowly, very, very slowly the beans have been cooking. She did not complain. With a mesmerising patience she was adding the necessary ingredients, each on its own time, the right time. The dish at the end was sublime. Cooked on slow fire, all flavours magically mixed together, softened, enhanced to perfection. My grandmother would look at us, hungrily devouring every bite in an ever-restless hurry to go back to our game in the garden and would ask if the dish was alright. All the reward she will get for her tiresome toil, our childish acknowledgement that the food is really tasty. I wish I had said more often that the food was divine. I wish…

    Red beans is not a common dish in our modern daily diet. We do not have time to let the ingredients simmer until eternity and be bound to the kitchen for more that four hours. Yet, occasionally, when something steers my soul and the cry for days long gone by makes me move mountains to get closer to home, cooking my grandmother’s dish becomes a cleansing ritual, a family reward and a sumptuous delight.

    Ingredients

    • 250g red beans
    • 250g pork cut in small pieces
    • 250g tomato paprika can
    • 1 onion
    • 1 carrot
    • 1/2 chicken bullion
    • salt
    • black pepper
    • red paprika powder
    • 1l water
    • fresh parsley
    • fresh mint


    Method

    1. Wash the red beans and let them souk in water over a night.

    2. Change the water of the beans and let the boil for one hour until starting to get soft.

    3. In another deep pot fry the speck until golden brown. Add the chopped onion and the chopped carrot and cover slightly with water. Let simmer for 10 minutes until the onion and the carrots and have slightly softened.

    4. Drain the beans and add them to the pork, onion and carrots. Add the paprika tomato paste and add 250ml of water. Let simmer for at least one more hour.

    5. When the beans have become softer and all the ingredients have started to come together, season with salt and black pepper, the paprika powder, the chicken bouillon and the fresh parsley and mint. Mix well and let simmer for additional half an hour, adding water occasionally if the dish starts to become too sticky and dry.

    6. The beans are ready when they softly melt, without any hardness in a bite. Season with additional fresh mint and serve. Eats well on its own or with toasted slices of bread.

  • Grandma’s Easter Lamb

    Grandma’s Easter Lamb

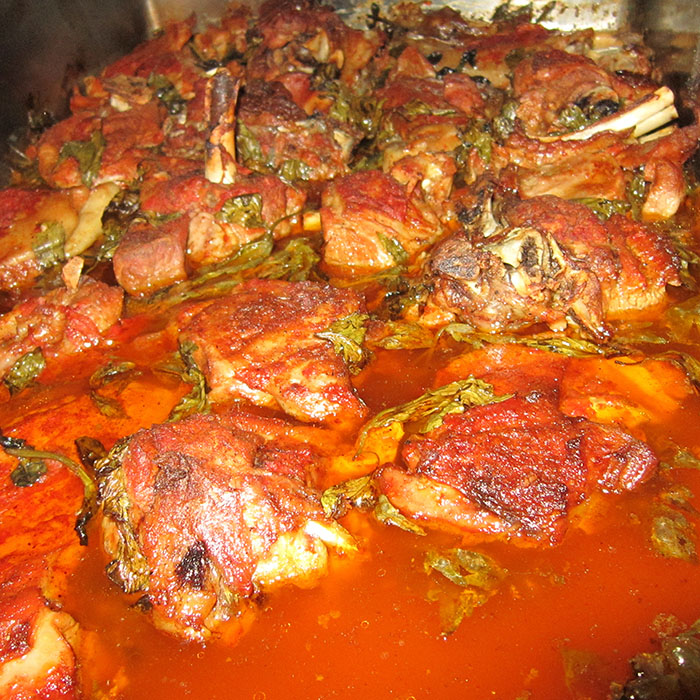
    Baking an Easter Lamb is a beautiful tradition in Bulgaria…

    I remember as a child my grandparents and my parents preparing each year this meal, but I have hardly ever realised that it is based on my grandmother’s own recipe or was it passed by from generation to generation I really don’t know.

    What warms my heart is that using her recipe I have something inherited from her, something precious and important that I can cherish and treasure, that will stay with me forever.

    The lamb, cooked following her recipe is indeed exceptionally delicious and moist, well baked and falling into pieces of pure delight.

    Ingredients

    • 1kg lamb chops
    • 1l tomato paste (liquid not thick)
    • 1tbsp of plain flour
    • 1tbsp red pepper powder
    • 1tsp black pepper
    • 1tsp salt
    • Black pepper
    • 100ml sunflower oil
    • A bunch of fresh mint leaves
    • A bunch of fresh lovage leaves


    Method

    1. Start by preparing the marinate sauce for the meat. Mix in a deep bawl the oil, the tomato paste, the  red and black pepper, plus the salt and the flour. Deep each piece of the meat in the marinate sauce and arrange on a flat oven tray for backing. Once all meat pieces have been dipped into the sauce, spread any remaining marinate pouring over the lamb. In-between each lamp piece tuck generously mint and lovage fresh leaves. Cover the tray with backing foil.

    2. Preheat the oven to 200C and bake the lamb tray for 1hour.

    3. Decrease the oven heat to 150C and bake the lamb for one more hour.

    4. Uncover the lamb by removing the foil and bake for an additional one hour until the meat is well baked.